
Activate & Connect
After deploying the extension, this guide walks you through registering an application on the Etsy Developers Portal, enabling the module in Magento's System Configuration, and establishing the OAuth connection.
Step 1: Register an Etsy Developer Application
To connect Magento with Etsy's API v3, you need an API key and shared secret generated from the Etsy Developers console.
1. Log in to the Etsy Developers Portal
- Visit https://www.etsy.com/developers and log in with your primary Etsy seller account.
- Click Your Apps in the top navigation or navigate to https://www.etsy.com/developers/your-apps.
- Click the Create a New App button.
2. Fill in Application Details
Complete the registration form with the following parameters:
- Application Name: Enter an identifiable name, such as
YourStore Marketplace Etsy Connector. - Description: Briefly describe that the application synchronizes catalog listings, stock levels, and customer orders with your Magento 2 multi-vendor store.
- Who will be the users of this application?: Select Just myself and collaborators or Public, depending on your organization structure.
- Is your application commercial?: Select Yes.
- Will your app do any of the following?: Check options relevant to your workflow (Upload/edit listings, Read sales data, Manage inventory).
- Callback URL / Redirect URI: Enter your exact Magento store callback URLs. Etsy allows specifying multiple callback URLs (one per line):
- For Admin Panel Accounts:(Example for default admin path and account ID 1:
https://<your-store-domain>/<admin_frontname>/mpetsymagentoconnect/oauth/index/id/<account_id>https://<your-store-domain>/admin/mpetsymagentoconnect/oauth/index/id/1) - For Marketplace Sellers (Frontend):
https://<your-store-domain>/mpetsymagentoconnect/oauth/index/
- For Admin Panel Accounts:
How to Add and Locate Callback URL Parameters
- Admin Front Name: Check
app/etc/env.phpfor'frontName'under thebackendsection (default isadmin). - Account ID: Navigate to Marketplace Etsy Magento Connect → Etsy Account Manager. After saving an account, its ID is visible in the grid and in the edit URL (
id/<account_id>). If you manage multiple Etsy accounts from Admin, add a callback line for each account ID (e.g.,/id/1,/id/2). - Multiple URLs: In the Etsy Developer console, you can register multiple redirect URIs so that both Admin authentication and Frontend seller authentication work with the same Etsy app.
3. Copy Your API Credentials
Once the application is created, navigate to the app details screen and copy:
- Keystring (Client ID): Used as the
Oauth Consumer Keyin Magento. - Shared Secret: Used as the
Oauth Consumer Secretin Magento.
Step 2: License Key Verification (Module License Tracker)
Webkul extensions require license authentication via the Webkul Module License Tracker (integrated via Webkul_Base). This tracks authorized module installations, unlocks full functional capabilities, and validates your store for official support and upgrades.
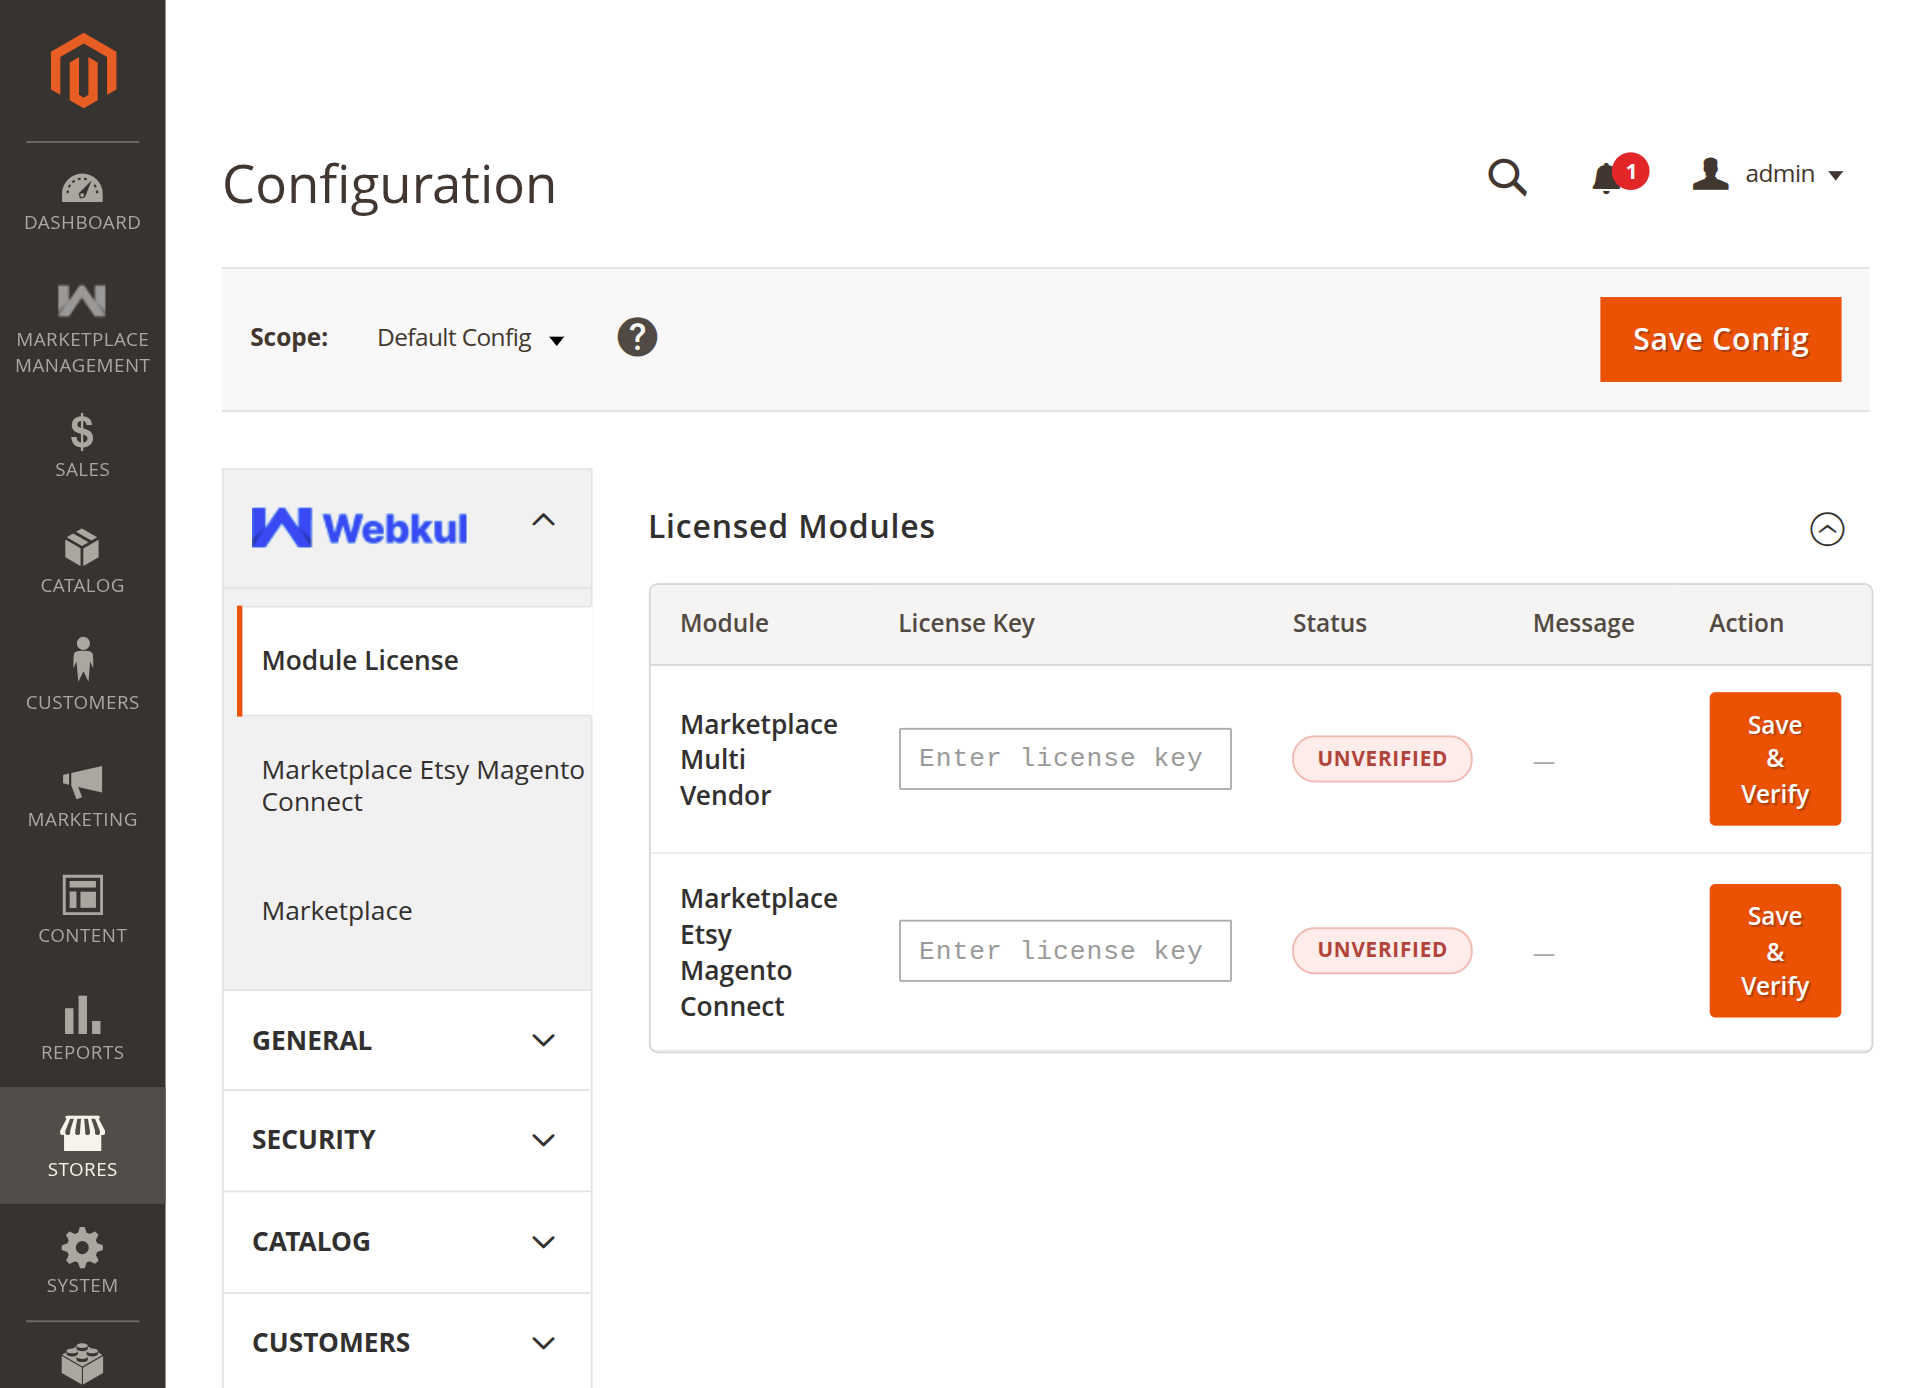
Verification Steps:
- Log in to your Magento Admin Panel.
- Navigate to Stores → Configuration → Webkul → Module License.
- Under the Licensed Modules table:
- Locate the row for Marketplace Etsy Magento Connect (as well as Marketplace Multi Vendor).
- The initial status will display as
UNVERIFIED.
- Enter the valid License Key corresponding to your purchase (retrievable from your Webkul Store account under your order downloads).
- Click the orange Save & Verify button in that row.
- The system connects to Webkul's license validation server. Once verified, the status indicator changes from
UNVERIFIEDtoVERIFIED.
Step 3: Enable the Module in Magento Admin
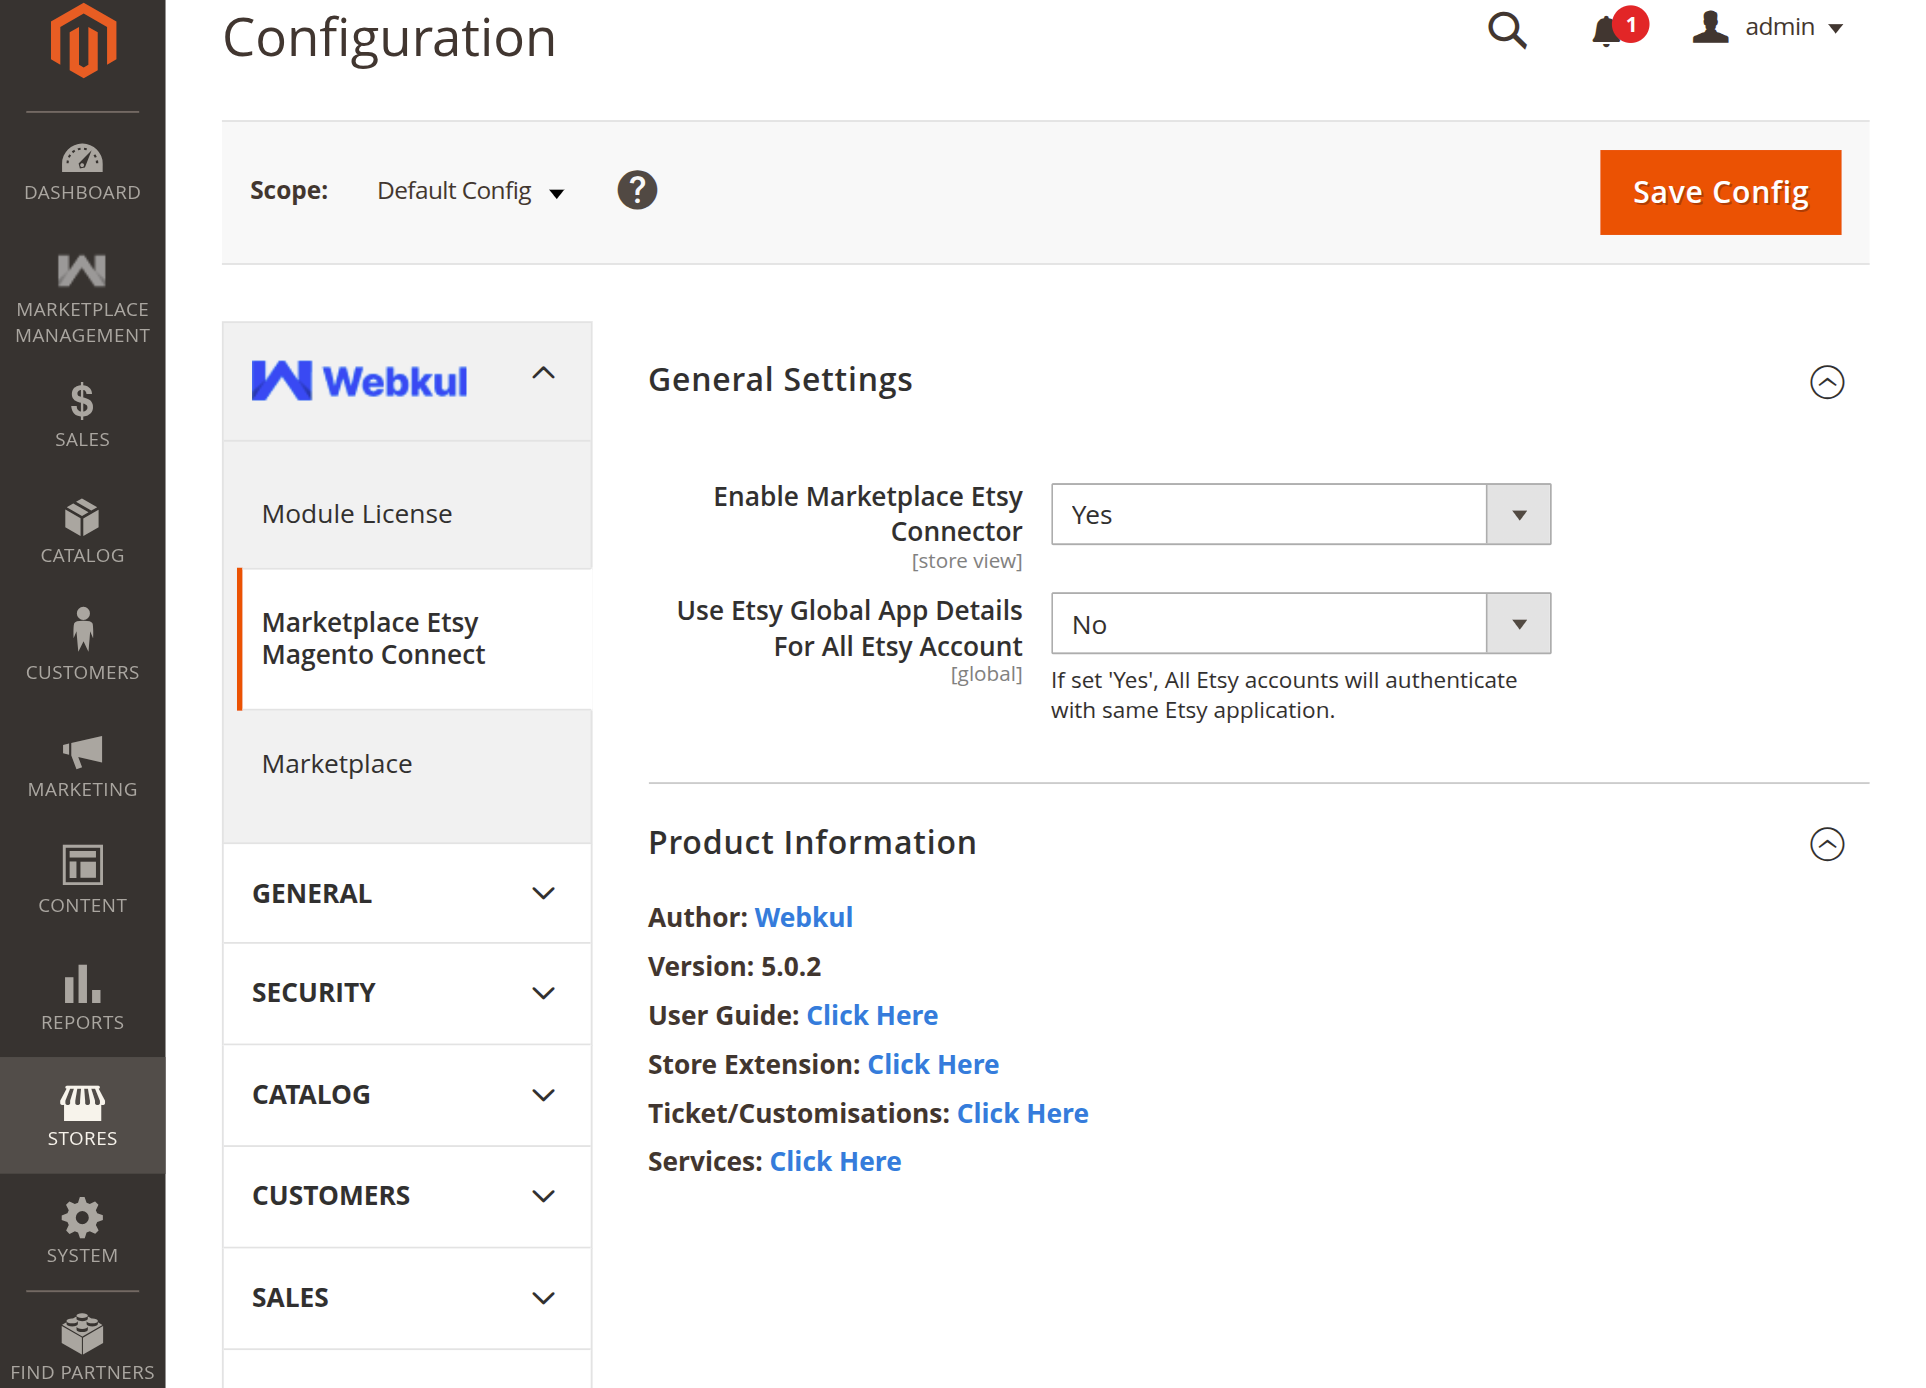
- In your Magento Admin Panel, navigate to Stores → Configuration → Webkul → Marketplace Etsy Magento Connect.
- Under the General Settings section:
- Set Enable Marketplace Etsy Connector to Yes.
- Configure the Global Etsy App mode:
- Use Etsy Global App Details For All Etsy Account:
- Yes (Recommended): All marketplace sellers authenticate against your store's single Etsy Developer App. Sellers only need their shop name without needing developer accounts.
- No: Each seller must create their own Etsy Developer App and input their individual Keystring and Secret into their seller panel.
- If set to Yes:
- Enter your copied Oauth Consumer Key (Keystring).
- Enter your copied Oauth Consumer Secret (Shared Secret).
- Use Etsy Global App Details For All Etsy Account:
- Click Save Config in the top right corner.
- Flush configuration cache:
php bin/magento cache:clean config
Step 4: Verify Admin Menu & Permissions
Once enabled, confirm the administrative menus are accessible:
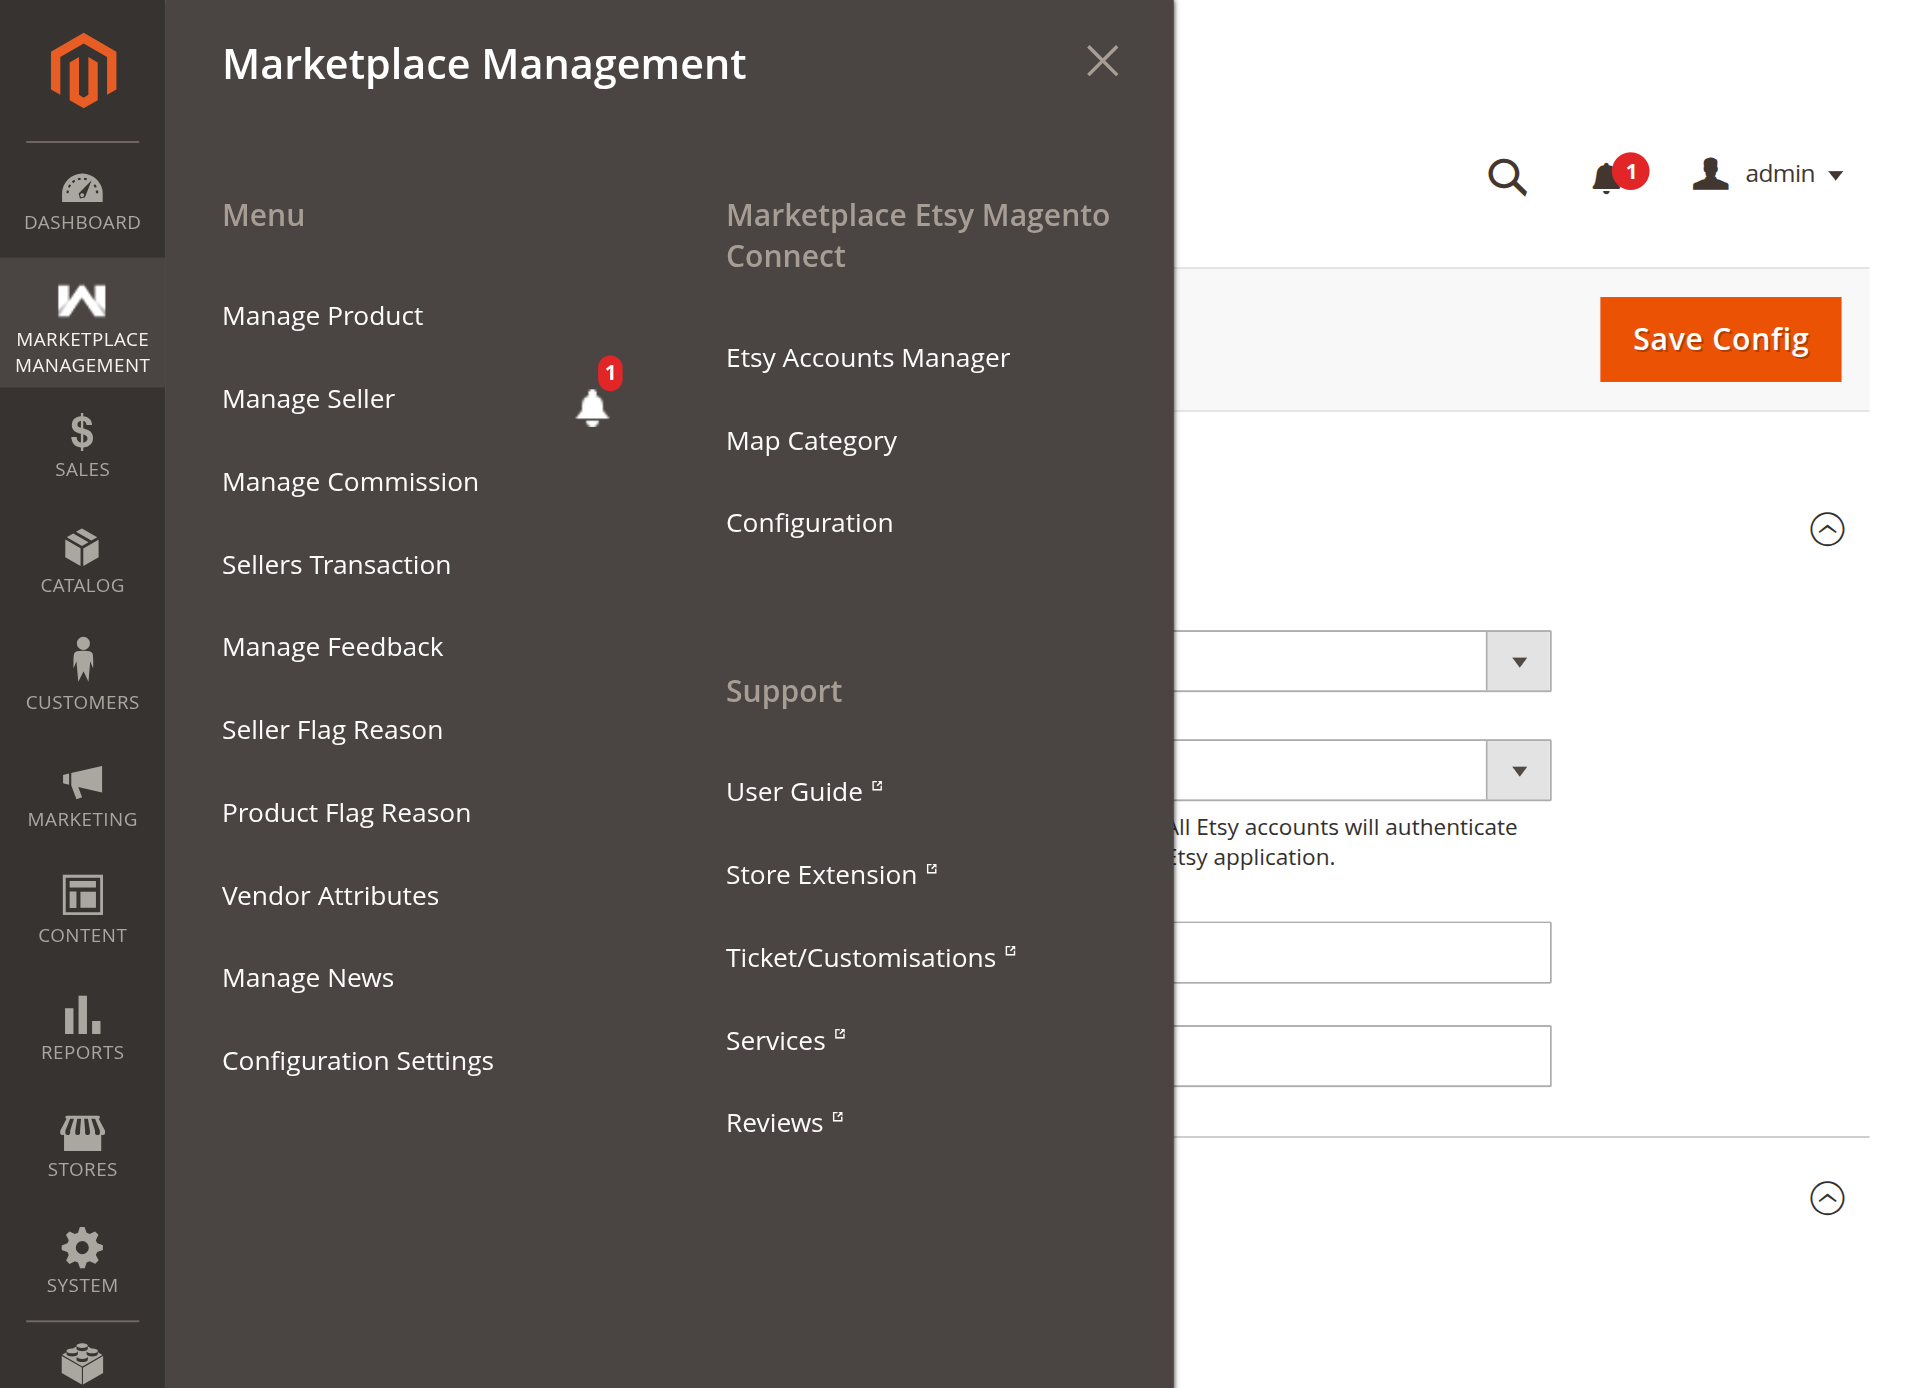
- Open the Magento Admin sidebar and navigate to Marketplace → Marketplace Etsy Magento Connect:
- Etsy Accounts Manager: View, add, edit, and authenticate Etsy seller shops.
- Map Category: Map Etsy taxonomy branches to Magento store categories.
- Configuration: Direct shortcut to the System Configuration section.
- For restricted administrative user roles, verify permissions in System → User Roles → [Role] → Role Resources:
- Ensure the resource Marketplace Etsy Magento Connect (
Webkul_MpEtsyMagentoConnect::manager) and its sub-resources are checked.
- Ensure the resource Marketplace Etsy Magento Connect (
Step 5: Verify Seller Dashboard Navigation
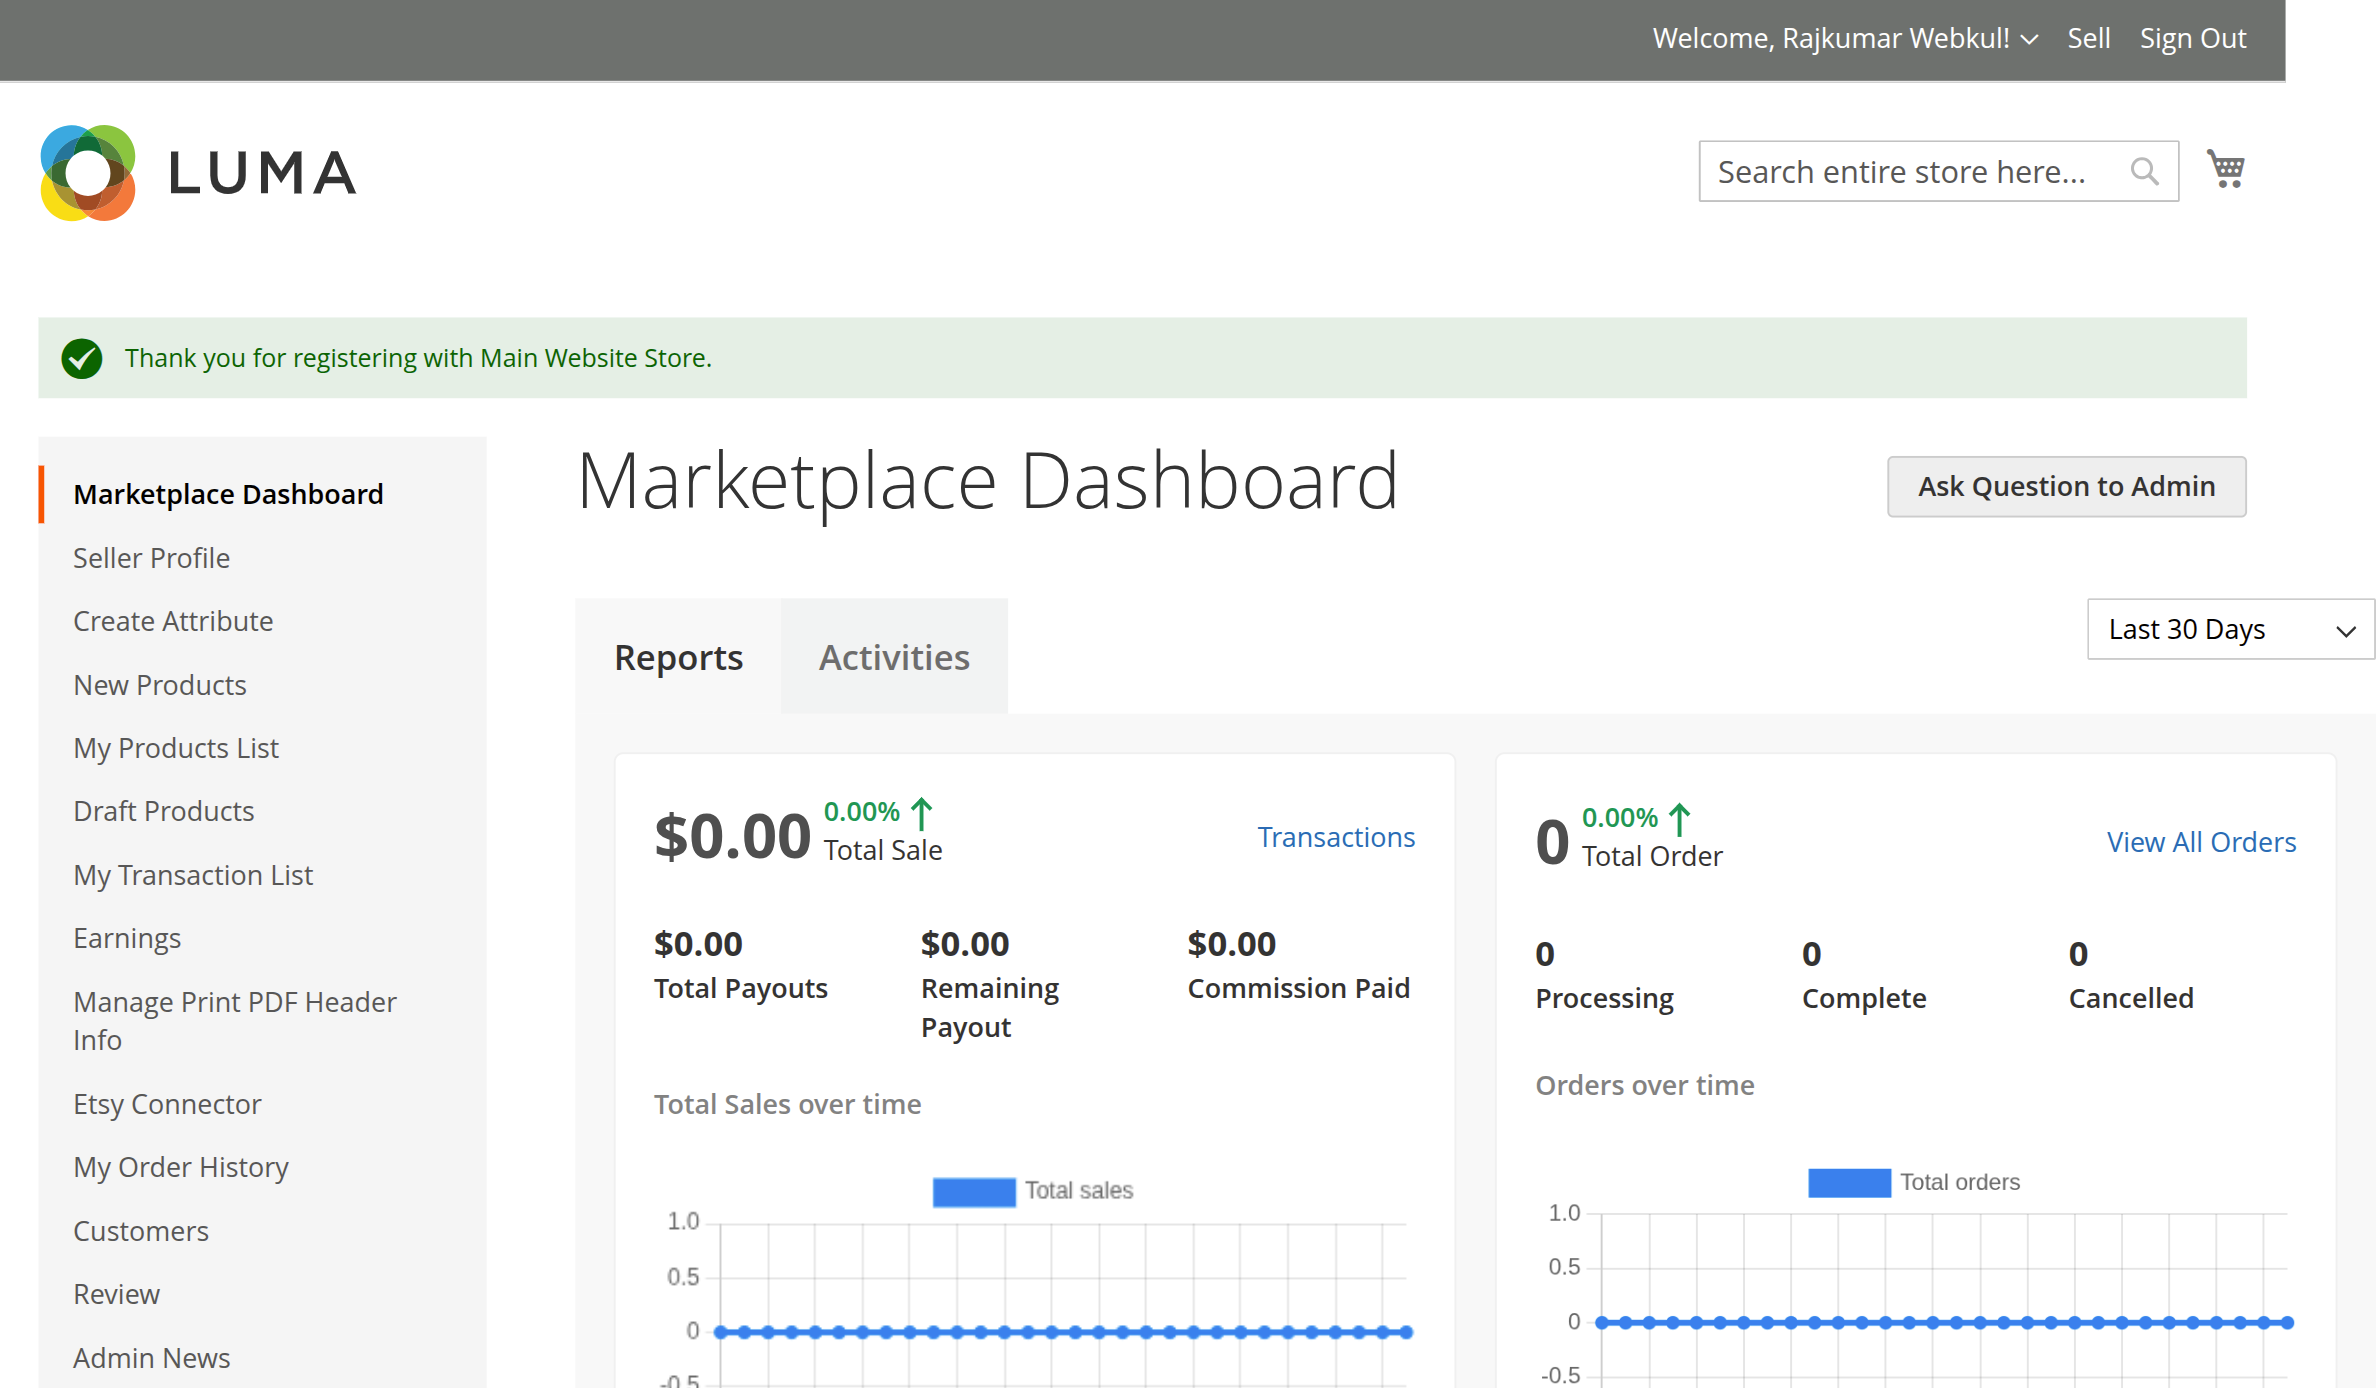
Log in to the storefront as an approved marketplace vendor and visit the customer account dashboard:
- Under the Marketplace navigation menu on the left, locate the Etsy Connector section:
- Etsy Account Manager (
mpetsymagentoconnect/account/index) - Etsy Settings (
mpetsymagentoconnect/settings/index) - Map Category (
mpetsymagentoconnect/category/index) - Import Product From Etsy (
mpetsymagentoconnect/productimport/index) - Export Product To Etsy (
mpetsymagentoconnect/productexport/index) - Etsy Order History (
mpetsymagentoconnect/importorder/etsyorderhistory)
- Etsy Account Manager (
- If the module is disabled in System Configuration (
status = 0), these menu items automatically hide from the seller navigation.
Next Step
Explore the connector's workflows in Module Overview & Workflow.